How To Backup & Restore WordPress site For Free Using Updraftplus
When it comes to website maintenance and security, backup is a very point to note. That’s why is recommended for everyone to backup their WordPress site in other to avoid losing important files when a disaster happens, such as a website got hacked or related issues.
I have seen a lot of bloggers having issues when it comes to restoring their website files when they make a mistake or trying to move from one hosting provider to another.
But when you backup a WordPress site, moving from one host to another won’t be a problem because you always have your files stored and the most interesting part of it all is that, WordPress site backup is 100% free with the help of UpdraftPlus WordPress backup plugin.
So I’m going to share with you a step-by-step guide on How To Backup & Restore WordPress site For free using Updraftplus
Importance of WordPress site Backup
There are numerous reasons why you need a backup WordPress site because as a business, you can’t stand to lose your data and audience after all the efforts you’ve put in other to build a great profile on search engines. Here are some reasons to backup your WordPress site;
- Human Error.
- Hosting Providers can Lose your Data.
- Vulnerability to Hackers.
- Unsuccessful Updates.
Human Errors
There is a high probability of making errors whiles you try to either upgrade things or are in the process of redesigning your website. A little mistake could crash the whole of your website within seconds, but when you backup your website regularly, you won’t face any hard time recovering your data because you can simply restore the backups from where it is stored.
Hosting Providers can Lose your Data
There is a high chance for your hosting providers to lose your data, and this often happens with most hosting companies with poor tech teams. Hosting providers can lose your data when they face server redundancy when one of their hard drives dies or their server may get hacked by top hackers.
Most hosting providers also don’t have a regular backup system and don’t keep data for a long while. I have personally faced this issue in the past when I mistakenly deleted all my WordPress files from my cPanel file manager, so I contacted my hosting provider to help me recover my data but they said “ They only have the last 2 months’ data of my site and it may take up to 72hrs for them o retrieve my data” I felt bad but not lost because I was smart enough to use UpdraftPlus auto backup so I simply reinstalled WordPress on same domain name and retrieve my files from backup.
Vulnerability to Hackers
We all are aware of the fact that the rate of increase in cybercrime has greatly increased in recent years, where most bloggers lose their important data and had to start afresh and were frustrated, but when you backup your website on regular basis, you do not have to worry about this because you always have a copy.
Unsuccessful WordPress Updates
WordPress releases updates regularly in other to improve functionality and improve the security system of their platform for users. This involves, updating plugins, and updating the platform version as a whole. However, not all updates go successfully, in most cases, after an update has been rolled out most plugins will be outdated and may not be compatible with the latest version and this could lead to website crashes or other internal errors.
I believe the reasons listed here alone are enough for you to start a backup today. WordPress does not have a built-in backup system so we are going to use a free plugin name UpdraftPlus.
With all this said, let’s take a look at How To Backup and Restore WordPress site For free using UpdraftPlus.
How to install the UpdraftPlus plugin
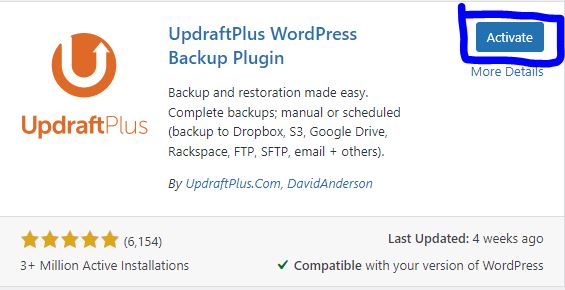
To start the backup process, you will have to firstly install and activate the updraftPlus plugin to benefit from it.
Follow the steps below to install the plugin;
- Log into your WordPress dashboard.
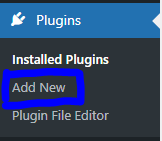
- Locate Plugins> Add New.
- Type in “UpdraftPlus” in the search bar.
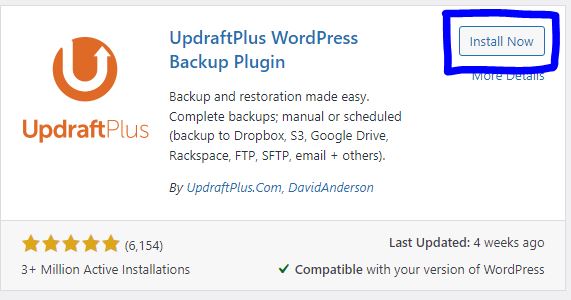
- You will then see the “UpdraftPlus” plugin, click on Install and Activate.
- After you see the Plugin activated message, then you are done.
Options of WordPress site Backup on UpdraftPlus
There are mainly two backup options UpdraftPlus, which are;
- Auto Backup.
- Manual Backup.
I recommend you go with auto backup so that, you don’t have to always go back to the plugin page to backup but let the plugin do it automatically.
However, everyone has their options so am going to show you how to set up both backup options.
How to Create Automatic WordPress site backup with UpdraftPlus
After you’ve successfully activated the plugin, Navigate to Settings > UpdraftPlus Backup to start the plugin configuration process.

After you’ve clicked on the plugin name, you will be redirected to the plugin dashboard. One’s you’re there, locate the “Setting” option and click on it.

Now you need to click on the setting tab to set up your backup option and remote server to backup files to.

On this page, choose your automatic backup options and the backup frequency. I recommend you choose the options above because that’s how I set mine and it’s working just fine.
Nonetheless, you can also change the backup frequency if you wish to. Your backup schedule should be based on how often you update content on your website, if you publish daily or make changes daily then I recommend you go with the above options.
After you are done with the backup schedule settings, now you need to choose a destination ( the remote server you want your backups to be sent to.
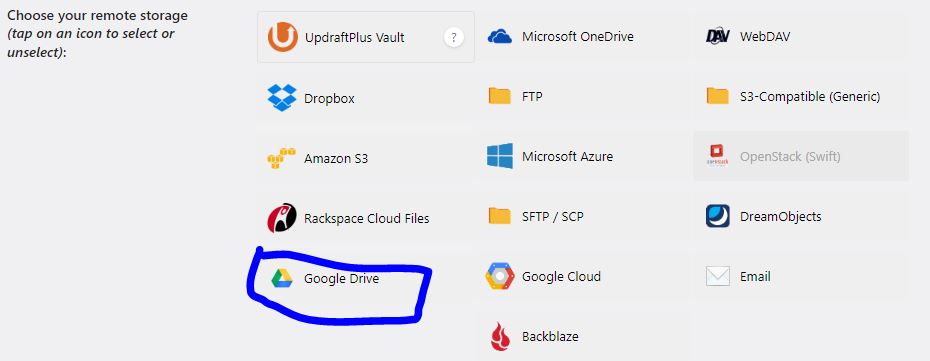
UpdraftPlus allows users to choose a backup server option. there are numerous remote storage available for you to pick from and most of them are completely free to use, and you can also send your backup files to your email address if you wish.
Note: Never save your backup files to the same storage as your website, because when you lose your website, you also lose your backup files and you don’t want this to happen.
As I already mentioned, just choose your remote storage option and UpdraftPlus will show you a configuration guide.
I’m going to go with “Google Drive” and show you how to configure it in this tutorial because it’s completely free and can be accessed on any device.
After you’ve chosen Google Drive as your backup server, ignore all the messages on the page and scroll down to the bottom of the page and click on the “Save settings/Save changes button”.
After you’ve saved changes, now it’s time to grant UpdraftPlus access to your Google drive so they can upload your backups automatically.
After you’ve clicked on the save changes button, you should see a popup, like just click on “Sign In With Google.“

In case you didn’t see this popup, kindly scroll down until you see the configuration settings as shown below.
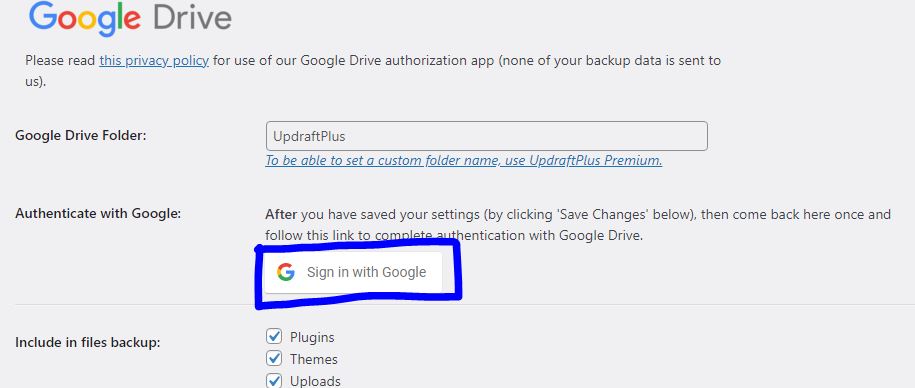
Make sure to click on “Sign in with Google”, the link will take you to the Google login page where you will have to choose an already existing Gmail account to continue or simply add a different account by clicking on the use another account option.
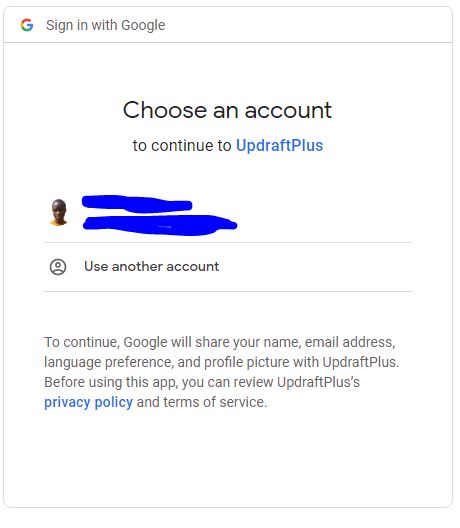
After you’ve chosen an account and signed in, you will be asked if you want to grant UpdraftPlus access to your google drive account.
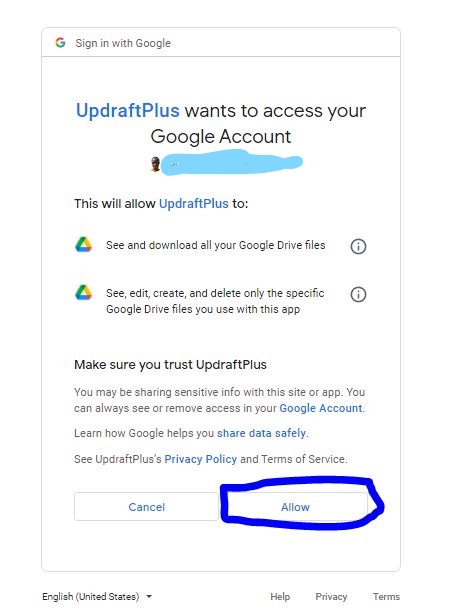
Make sure to click on “Allow”, UpdraftPlus will only have access to the personal folder wish they created by default during the setup.
You will then be redirected to UpdraftPlus official website where you will need to click on “Complete Setup” to finalize the setup process.
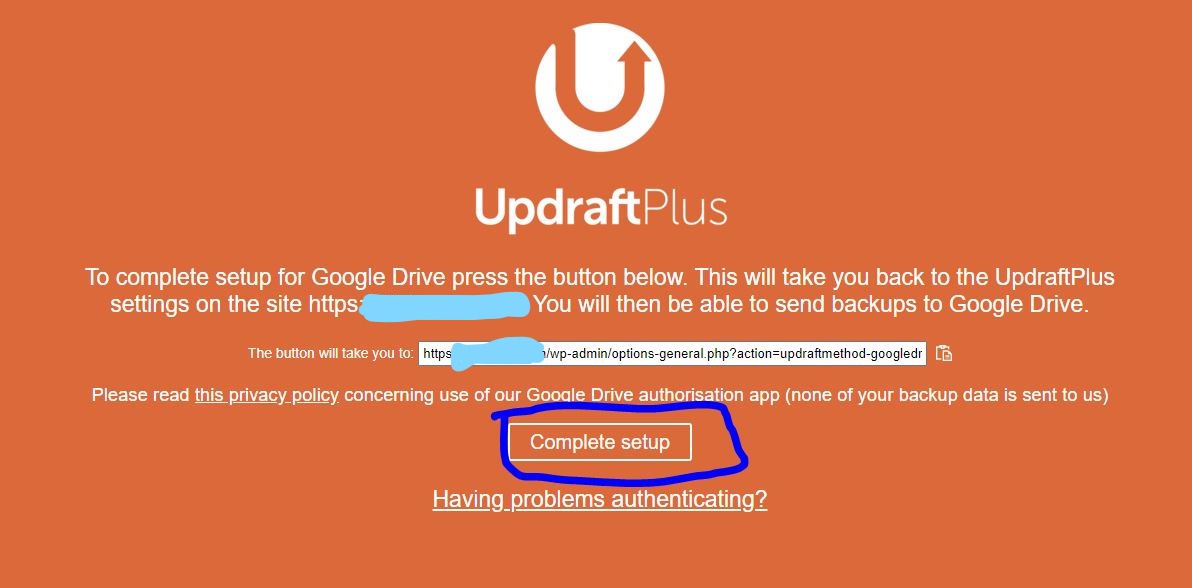
The button will then take you back to your WordPress site, and you will see the UpdraftPlus setting page- just scroll done the page and click on Save Changes, and we are done setting up the automatic backup.
How to setup manual WordPress site Backup With UpdraftPlus
After the settings you created above, UpdraftPlus will automatically backup your WordPress website without and work from your end.
However, you can also backup manually if that will work best for you.
To create a manual backup on the UpdraftPlus plugin, you will have to navigate to your “Settings>UpdraftPlus backup” and click on the Backup Now button.

This will then show a popup with options for you to choose if you want to include your database, include your files in the backup and the option for you to send to remote storage.
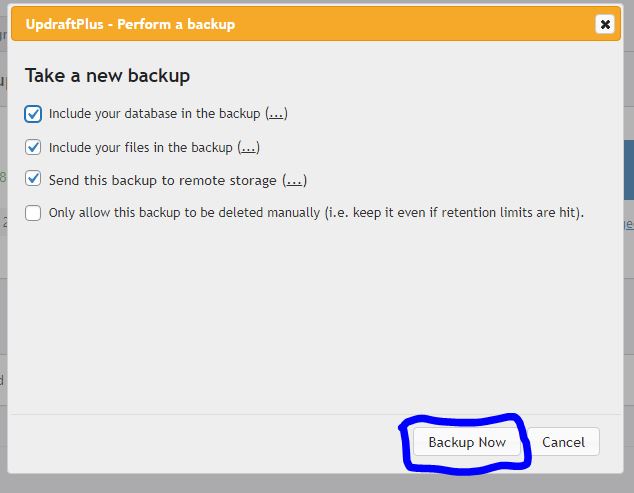
Just click on the “Backup Now” option to continue.
After which UpdraftPlus will start creating a backup of your files and database. You will then see a progress bar showing you the files being backed up.
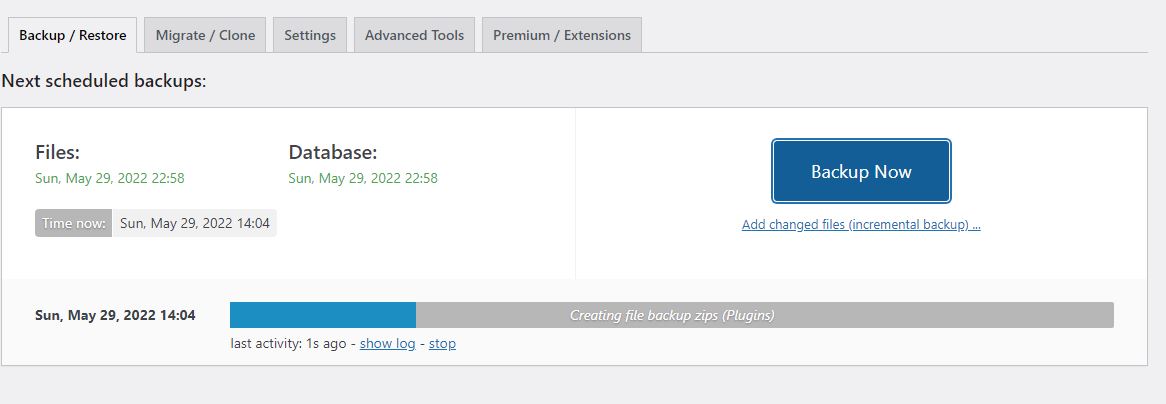
The time it will take for the backup to complete, will depend on the size of your website. UpdraftPlus will automatically upload the backup file to the remote storage you choose when setting up the plugin.
How to Restore WordPress Site Backups with UpdraftPlus
The major reason why you created the backup is the ability for you to restore it when you make an error or your website gets hacked.
Well, you don’t have to be worried about this, since you use UpdraftPlus plugin to backup your WordPress site.
To restore your WordPress site from a backup with the Updraft plugin is simple. You firstly have to re-install WordPress on the same domain name which was backed up with the plugin.
Once you’ve completely installed WordPress, now you have to “Install and Activate the” UpdraftPlus plugin on your new WordPress site.
Next, you will have to navigate to Settings on your WordPress dashboard and click on UpdraftPlus Backup.
This will then open up the UpdraftPlus dashboard and scroll down till you see the existing backups.

In case you downloaded your WordPress site backup files to your computer, you can simply click on ‘Upload backup file’ and you’re going to see a drop-down box below where you can simply drag and upload your backup.
But in the case where you didn’t download the backup to your desktop or computer, you can go to the settings tab and connect to the remote storage where you formally backup your files.
Next, after you’ve successfully linked your UpdraftPluss to the remote server, now you can click on the ‘Rescan remote storage’ link.
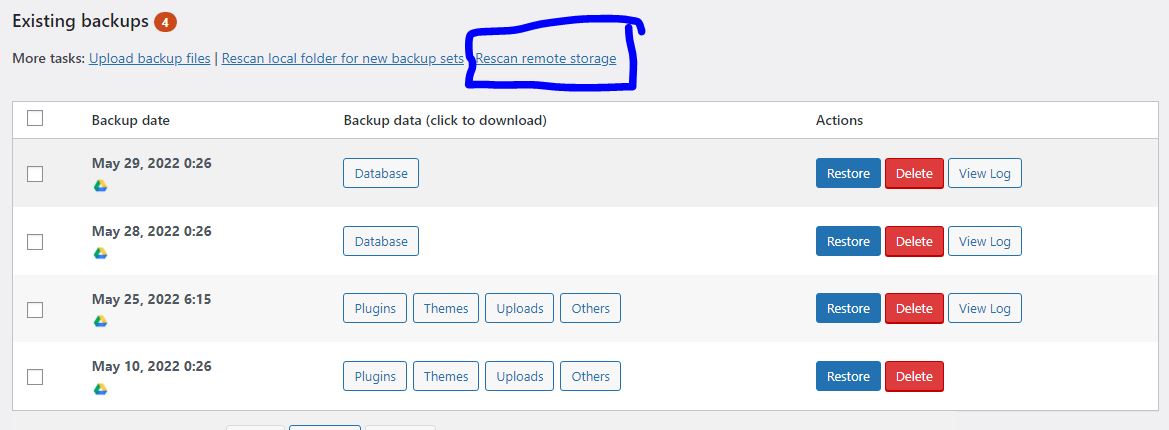
UpdraftPlus will now scan through your remote storage and display all the backup files below.
Next, just click on the ‘restore’
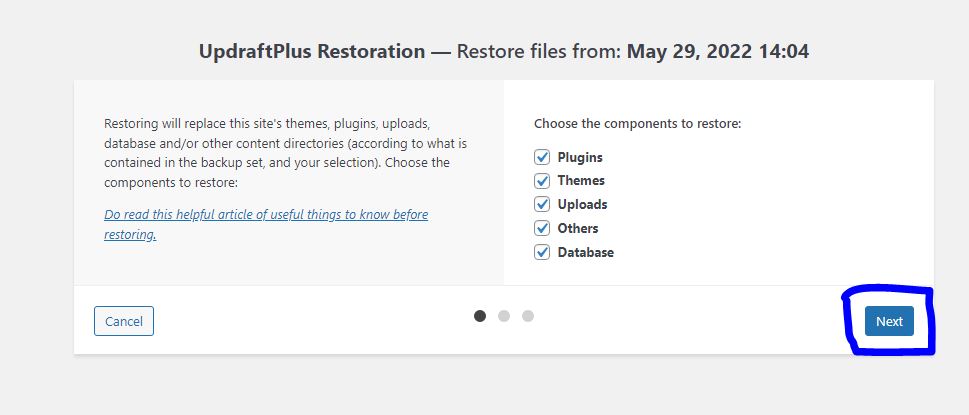
UpdraftPlus will then open up a popup asking you to select the files you wish to restore, make sure to select all files and click the ‘Next’ button.
UpdraftPlus will now download all the backup files from the remote storage and restore them automatically to your WordPress site.
Boom you now have your site back 😍.
Related: The Complete Guide To Link Building: How To Get More Backlinks And Why They Matter
Must Read: How To Drive Organic Traffic To Your Website – A Simple Guide
Conclusion
WordPress site backup is a very key point in security and this could help you restore all your site in case of emergency. However, this doesn’t mean your website can’t be hacked, your website can still be hacked but your backup files can’t be hacked because they are on a different server.
Thanks, that’s all about Backing up your WordPress site for free with UpdraftPlus and I hope this blog post will help you to backup and restore your WordPress site with ease.
If this article was helpful, do well to subscribe to my YouTube Channel for more Blogging Tutorials. You can also follow us on Twitter and Facebook. Also, consider sharing this post on your social media handle and tag us.
This post contains affiliate links.




One Comment